
LightBurn provides many design tools to help laser engraving users create accurate and efficient layouts. Among them, the Circular Array feature is useful for creating repeated patterns arranged around a center point.
This tool is ideal for designs that require evenly spaced elements, such as clock faces, coasters, decorative patterns, and circular engraving projects. This guide explains how to use the Circular Array feature in LightBurn step by step.
Step 1: Select or Create a Graphic
- Start by selecting or drawing the object you wish to arrange. This can be any shape—such as a rectangle, circle, or even a piece of text.
- Open your design file in LightBurn.
- Use the shape tools (e.g., Ellipse Tool, Rectangle Tool, or Text Tool) to create an object, or select an existing one from your canvas.
Step 2: Open the Circular Array Tool
After selecting your object:
- Locate the Array Tool on the left toolbar.
- Click on Circular Array to open the array configuration panel.

Step 3: Adjust Circular Array Settings
In the pop-up window, adjust the following parameters to your needs:
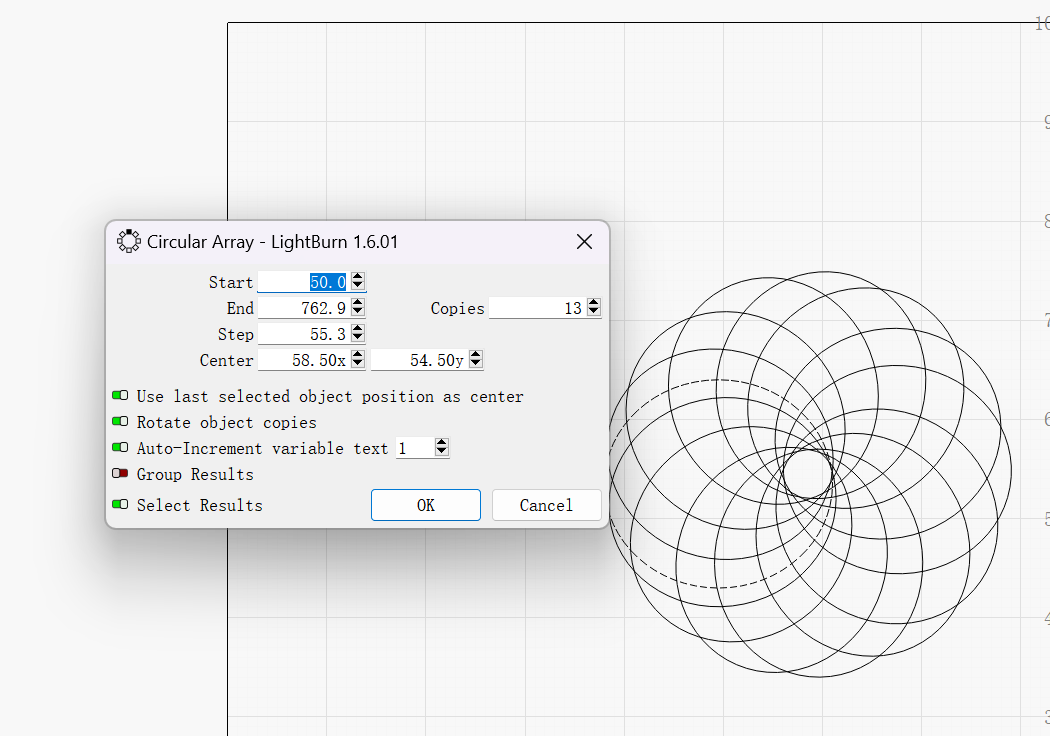
- Copies – Set the number of duplicates you want to generate along the circle.
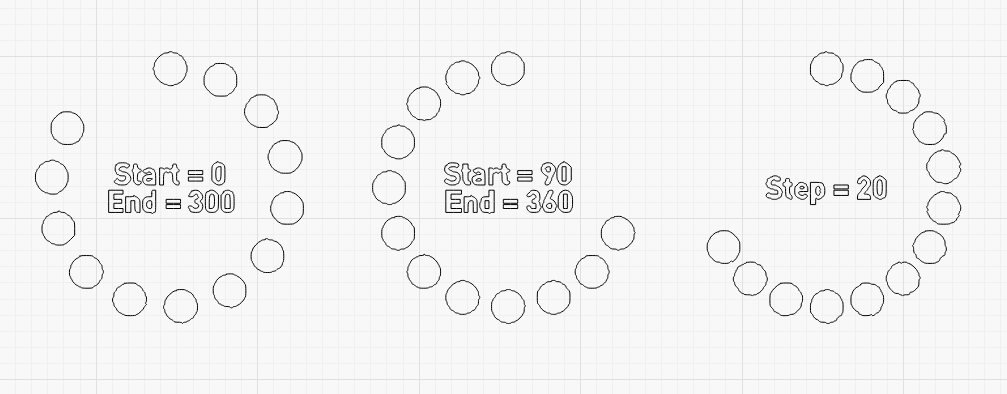
- Start / End Angles – Define the angular range over which the copies will be distributed. You can limit the array to a portion of the circle by entering a custom Start and End angle.
- Step (Angle Offset) – Specifies the angle between each copy. This is typically calculated based on the number of copies and total angle span, but can be customized manually.
- Rotate Object Copies – Toggle this option on to rotate each object so it faces the center (like the numbers on a clock), or off to maintain their original rotation.
- Auto-Increment Variable Text – When using variable text, this feature offsets each copy’s value by a fixed amount, ideal for creating numbered labels or unique IDs.
- Group Results – Automatically groups the resulting copies so they can be manipulated as a single unit.
- Select Results – Automatically selects the newly created objects after the array is generated.
Step 4: Complete the Array
Once you’ve set all parameters:
- Click OK to apply the circular array and generate the copies.
- Or click Cancel to exit without creating the array.
Step 5: Apply and Begin Engraving
After creating your array:
- Make any final adjustments (color, line mode, power/speed settings, etc.).
- When ready, click Start to begin engraving or cutting the circular array layout.
Conclusion
The Circular Array feature in LightBurn makes it easier to create symmetrical and evenly spaced designs for laser engraving projects. By adjusting settings such as copies, angles, and object rotation, users can quickly create complex circular patterns with accurate positioning.
Whether you are designing decorative artwork, signs, or functional products, this feature can help improve your workflow and expand your creative possibilities with Longer laser engravers.
Share:
LONGER Academy: Top Diode Laser Safety and Usage Guide: Longer Ray5 10W Review
LONGER How To: Set Up Rotary Roller Engraving in LightBurn