
Engraving grayscale images on black anodized aluminum plates requires proper parameter settings, image processing, and engraving mode selection. With the Ray5 series laser engraving machines, users can create detailed grayscale effects by adjusting settings in LightBurn.
This guide uses the Ray5 10W as an example. It explains how to select the engraving mode, configure parameters, and adjust image settings to achieve clearer grayscale engraving results on black anodized aluminum.
The main factors include engraving speed, power, line interval, scanning angle, image mode, brightness, contrast, and Gamma adjustment.
1. Parameter setting and image mode selection
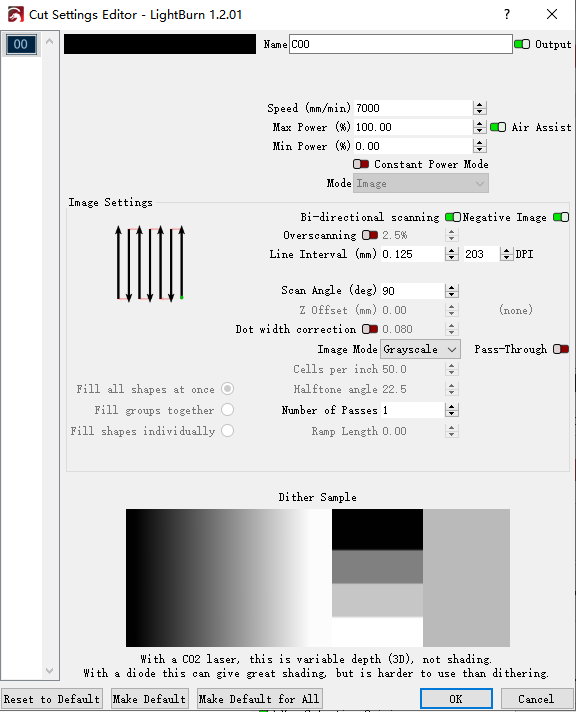
The engraving result is closely related to the machine settings. Before engraving, open the Cut / Layers interface in LightBurn and double-click the layer settings to enter the Cut Settings Editor. For the Ray5 10W, the recommended parameters are:
- Speed: 7000 mm/min
- Maximum Power: 100%
- Minimum Power: 0%
- Line Interval: 0.125 mm
- DPI: 203
- Scan Angle: 90°
For other Ray5 models, adjust the parameters according to the corresponding parameter table. For the Ray5 5W, the recommended scan angle is 0°.
Since black anodized aluminum engraving changes the surface from black to white, select:
- Negative Image
This setting helps create the correct engraving effect.
Choose the Right Image Mode in LightBurn
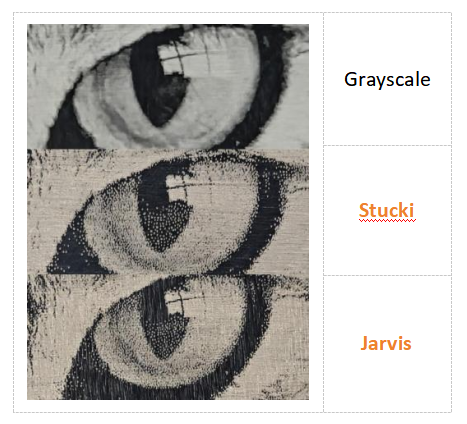
LightBurn provides several image modes, including:
- Grayscale
- Stucki
- Jarvis
Different modes produce different engraving results.
Compared with Stucki and Jarvis, Grayscale mode provides smoother transitions and more detailed shading. For grayscale engraving on black anodized aluminum, Grayscale mode is recommended.
2. Set image properties
Image contrast and brightness parameters have a direct impact on the final engraving effect. Select the engraved image in Lightburn, right-click and select Adjust image to enter the image parameter adjustment interface, as shown in the figure below.

Recommended Image Adjustment
Based on engraving tests, avoid setting the contrast too high. Excessive contrast may remove image details. When adjusting brightness:
- Avoid making the image completely white.
- Avoid making the image completely black.
For the test image in this guide, the recommended settings are:
- Contrast: -38
- Brightness: -19
- Gamma: 0.925
These values are reference settings only. Different images may require different adjustments based on the engraving result.
Tips for Better Grayscale Engraving
To achieve better engraving quality on black anodized aluminum:
- Use Grayscale mode first.
- Adjust engraving parameters according to your machine model.
- Avoid excessive contrast adjustments.
- Fine-tune brightness and Gamma based on the actual engraving result.
- Test different image settings when working with different images.
Conclusion
The Ray5 series laser engraving machines can create detailed grayscale images on black anodized aluminum plates with proper settings.
For better results, start with Grayscale mode and adjust the engraving parameters based on your machine model. Image settings such as brightness, contrast, and Gamma should also be fine-tuned according to the actual engraving effect.
The recommended values in this guide are reference settings. Different images may require additional adjustments to achieve the best engraving quality.
Partager:
LONGER How to:How to use laser to engrave ceramics
Lens Cleaning for Longer B1 30W & 40W