
The first layer is one of the most important parts of a successful 3D print. A properly calibrated first layer helps the filament stick to the print bed evenly and creates a stable foundation for the entire model.
For LONGER 3D printers, first layer calibration adjusts the distance between the nozzle and the printing surface. Correct calibration ensures that the extruded filament is slightly compressed, creating smooth and consistent lines.
This guide explains how to calibrate the first layer, identify common problems, and maintain reliable printing results.
What Is First Layer Calibration?
First layer calibration adjusts the gap between the nozzle tip and the print bed. If the nozzle height is correct:
- The filament sticks properly to the surface.
- The printed lines are evenly placed.
- The first layer has a smooth and uniform appearance.
If the distance is incorrect, the first layer may fail to stick or may be printed unevenly.
How to Calibrate the First Layer
LONGER 3D printers include a calibration menu that helps users adjust the printing platform accurately. The calibration process uses five preset points on the print bed. Follow these steps:
- Access the calibration function from the printer display.
- Move the nozzle to the calibration points.
- Place a sheet of paper between the nozzle and the print bed.
- Adjust the four leveling knobs manually.
- Set the distance so the paper can move with slight resistance.
The goal is to achieve a small and consistent gap between the nozzle and the printing surface.
Check the First Layer Quality
After calibration, print a first-layer test to check the result. A correctly calibrated first layer should have:
- Even lines.
- Proper adhesion.
- No visible gaps between lines.
- A smooth surface without raised edges.
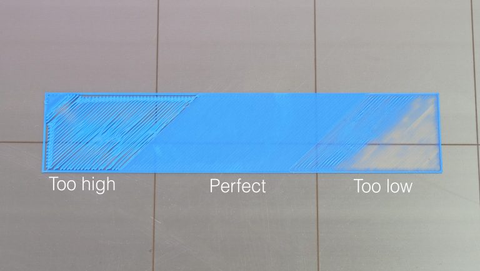
Nozzle Too Far from the Print Bed
- The filament lines appear round instead of slightly flattened.
- The lines are separated from each other.
- The material may not stick properly to the surface.
This can cause poor adhesion and may result in material buildup around the nozzle.
Nozzle Too Close to the Print Bed
- The filament lines become overly compressed.
- Lines may overlap.
- Raised edges or ridges may appear.
A nozzle that is too close can also cause nozzle blockage, excessive bed adhesion, or damage to the printing surface.
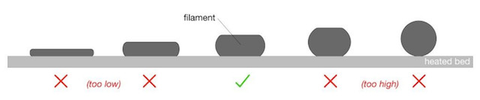
Common First Layer Problems and Solutions
1. Poor Adhesion After Correct Calibration
Sometimes, the first layer may fail to adhere to the print plane despite the calibration being done correctly. In these cases, you can proceed with the thorough cleaning of the printing surface, so as to remove the accumulated dirt; in case the problem persists, you can proceed with the increase of the flow related to the first layer, a topic that will be covered in a future lesson.
2. When to Recalibrate the First Layer
Once a perfect calibration has been obtained, this will not be eternal: the first layer calibration will have to be checked periodically, and surely it will have to be done again every time you move the printer to a different place, you make the nozzle replacement, the extruder change, the replacement of the plane or any other modification to one of the 3 axes.
3. Adjusting Z Endstop Position
In some case, it could be found that the calibration is impossible to carry out on the 5 points, that is, the 4 corners of the plane are well calibrated while the center is too close to the tip of the nozzle. This could be caused by incorrect placement of the Z endstop.
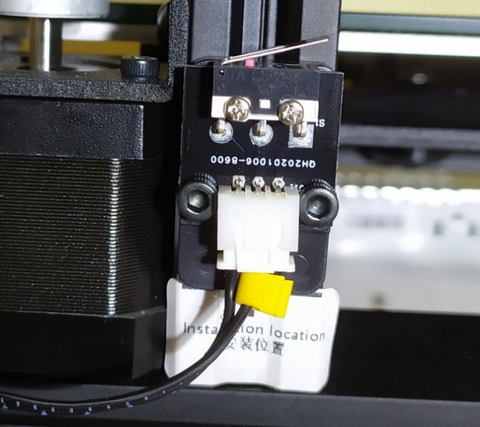
Longer 3D printers have a sticker that indicates where endstop Z should be placed. However, if endstop Z is placed too low, as a result it will be necessary to lower the printing plane as well, screwing more the 4 adjustment knobs; on the other hand, excessively screwing the corners inevitably causes a deformation of the aluminum top, which takes on a curved shape with the highest center of the corners.
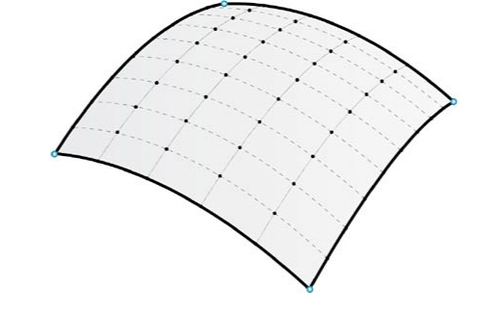
In these cases, it is possible to place endstop Z higher, so as to be able to raise even the 4 corners of the plane and cancel the curvature. On the other hand, it is advisable not to exceed the positioning of endstop Z at the top, as this would cause an instability of the printing plane due to insufficient screwing of the 4 levelling knobs.
Tips for Better First Layer Results
For consistent first layers:
- Always check the first layer when starting a new print.
- Monitor the printer until the first layer is completed.
- Keep the print surface clean.
- Recalibrate after making hardware changes.
- Make sure the print bed remains level.
Conclusion
First layer calibration plays an important role in achieving successful 3D prints. By setting the correct nozzle height, maintaining a clean print surface, and checking calibration regularly, LONGER 3D printer users can improve adhesion, print quality, and overall printing reliability.
Partager:
LONGER LK5 Pro Full Use Tutorial: Assembly&Setup Instruction
Longer LK4 Pro & LK5 Pro – Upgrades by @Ciubecca