
In laser cutting and engraving, an optimized cutting path can help improve processing efficiency and reduce unnecessary machine movement. When working with complex designs, the laser head may spend extra time traveling between objects if the cutting order is not properly arranged.
LightBurn provides Cut Optimization Settings to help users organize cutting paths, reduce idle movement, and improve overall workflow. This guide explains what path optimization is, common optimization methods, and how to configure these settings in LightBurn.
1. What Is Path Optimization?
Path optimization refers to the strategic arrangement and adjustment of cutting paths to maximize efficiency and reduce unnecessary movement of the laser head. Specifically, it includes:
a) Shortest Path Selection:
Choosing the shortest possible path for the laser to minimize idle movements.
b) Path Sorting and Merging:
Ordering multiple paths logically to avoid backtracking and redundant movements.
c) Cut Order Optimization:
Organizing the cutting sequence to prevent repeated travel over the same area.
d) Travel Optimization:
Reducing non-cutting (traveling) moves and minimizing rapid jumps between points.
The goal of path optimization is not only to save time, but also to reduce material waste and extend machine life. A well-optimized cutting path is key to increasing productivity and processing quality.
2. Main Optimization Strategies in LightBurn
LightBurn provides several built-in path optimization strategies to support efficient operation even in complex designs. Below are the primary optimization directions offered
a) Optimize by Group:
Group-based optimization ensures that the laser head performs continuous cutting within a group of related or similar objects before moving to another group.
How to Use: Group objects or merge layers in your design. LightBurn will prioritize cutting paths within each group.
Benefits: Reduces unnecessary travel and backtracking, improving overall cutting speed and workflow efficiency.
b) Optimize by Layer:
Layer-based optimization organizes cutting tasks according to layer priority, ensuring each layer is completed in an optimal sequence.
How to Use: Assign specific cut orders to layers in your project. LightBurn follows this preset order to optimize the laser path.
Benefits: Prevents excessive jumping between layers, reducing idle time and enhancing productivity.
c) Optimize by Priority:
Priority-based optimization allows users to define which parts of the design should be cut first, based on importance or complexity.
How to Use: Assign priority levels to different objects or paths. LightBurn will automatically follow the priority levels, cutting high-priority paths first.
Benefits: Useful for delicate or detailed areas that need to be engraved or cut first to ensure quality and avoid shifting or material issues later in the process.
3. How to Set Path Optimization in LightBurn
To enable and configure path optimization in LightBurn, follow these steps:
Step 1: Open Your Design
Launch LightBurn and import the design file you want to cut or engrave.
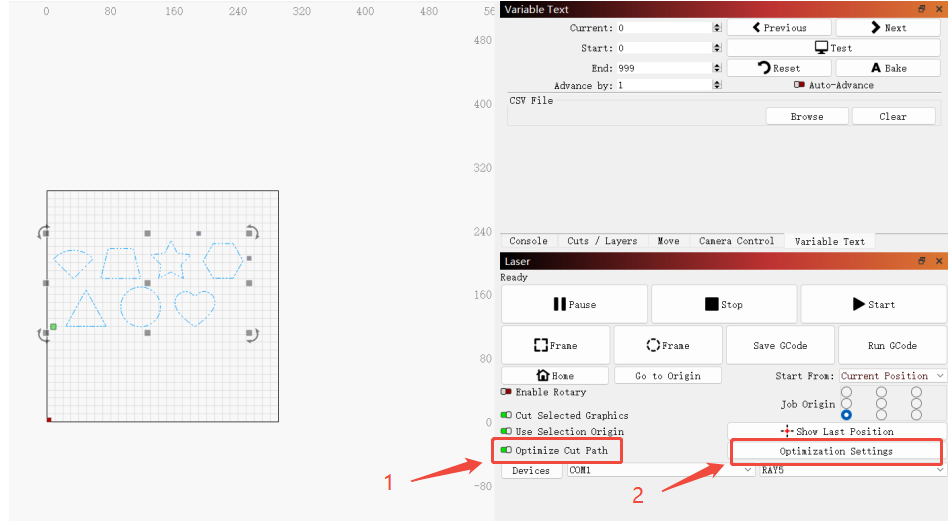
Step 2: Enable Cut Path Optimization
In the LightBurn interface, go to the lower-right area and enable: Optimize Cut Path
Step 3: Adjust Optimization Settings
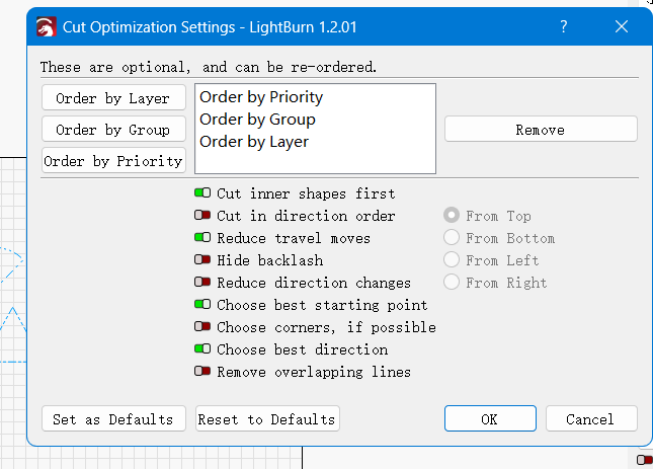
Click Optimization Settings to open the Cut Optimization Settings panel. Here you can configure options such as:
- Order by Group
- Order by Layer
- Order by Priority
- Inner shapes before outer shapes
- Reduce direction changes
Choose the settings based on your project requirements.
Step 4: Start the Job
After adjusting the optimization settings, LightBurn will calculate a more efficient cutting path for your project. Check the preview before starting the machine to confirm the cutting order.
Conclusion
Path optimization in LightBurn is a useful feature for improving laser cutting and engraving efficiency. By organizing cutting paths, reducing unnecessary movement, and adjusting the cutting order, users can save processing time and achieve smoother machine operation.
Whether you are working on simple designs or complex projects, understanding LightBurn’s optimization settings can help you get better performance from your laser engraving system.
Cuota:
LONGER How To|How to Upgrade the Firmware on the Nano Duo
Ray5 10W / 5W X-Axis or Y-Axis Not Moving — Troubleshooting