
Introduction
When creating laser engraving projects, you may need to add outlines, borders, or create a larger or smaller version of an existing design. In LightBurn, the Offset Shapes tool makes this process simple by creating new shapes based on the original object with a specific distance.
This feature is useful for many laser engraving applications, such as adding borders around text, creating cutting outlines, or designing layered graphics. It works with different vector objects, including paths, shapes, and text.
In this guide, we will show you how to use the Offset Shapes feature in LightBurn and explain each setting step by step.
Step 1: What Is Offset Shapes?
The Offset Shapes tool generates new shapes by outlining the selected object(s) at a specified distance—outward, inward, or in both directions simultaneously. You can use it for:
- Creating borders around text
- Designing offset cut lines around engraved objects
- Building complex, layered patterns
The tool supports all vector shapes and can offset multiple shapes at once.
Step 2: Accessing the Offset Shapes Tool
To use the Offset Shapes feature:

- Select all the shapes you want to offset.
- Navigate to the top menu: Tools → Offset Shapes,
- OR click the Offset button in the toolbar,
- OR press Alt + O on your keyboard.
This will open the Offset Shapes dialog window, where you can define how your offset will be generated.
Step 3: Configuring Offset Settings
Once in the dialog box, configure the following settings:
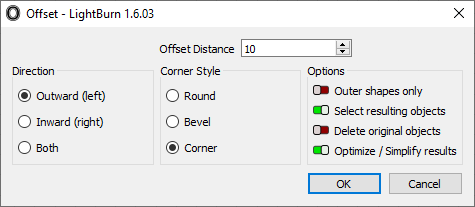
1. Offset Distance
Controls how far the new shape will be offset from the original. You can enter the value manually, use arrow buttons, scroll with your mouse, or drag with two fingers (if using a trackpad).
2. Direction
Defines on which side of the original object the new shape will be created:
- Outward (Left): Creates an offset that expands away from the shape.
- Inward (Right): Offsets toward the shape’s center.
- Both: Generates two shapes—one inward, one outward.
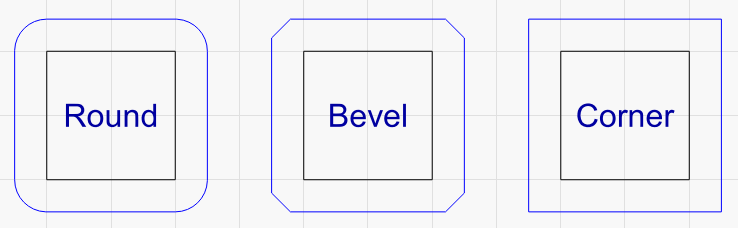
3. Corner Style
Determines how the corners of the offset path will be shaped:
- Round: Creates smooth, rounded corners.
- Bevel: Produces angled corners.
- Corner: Maintains sharp, angular corners.
Step 4: Advanced Options
Below the shape configuration settings, you’ll find additional toggles:
Outer shapes only – Ignores inner contours and only applies the offset to the outermost edge.
Select resulting objects – Automatically selects the newly created offset shapes once the process is complete.
Delete original objects – Removes the original selected shapes and replaces them with the new offset ones.
Optimize/Simplify results – Reduces the number of nodes in the offset path. Ideal for simplifying complex objects and reducing file size.
Step 5: Apply or Cancel
- Click OK to create the offset shapes based on your settings.
- Click Cancel to exit without applying any changes.
Conclusion
The Offset Shapes tool in LightBurn is a useful feature for improving your laser engraving workflow. Whether you are creating text outlines, preparing cutting paths, or designing layered graphics, this tool helps you create accurate shapes quickly.
By understanding the Offset Distance, Direction, Corner Style, and advanced options, you can make your laser engraving designs more flexible and professional.
Share:
LONGER How To: Grouping and Ungrouping in LightBurn
LONGER How To:Use Overcut in LightBurn for Laser Cutting