
When using a laser engraver, the best settings can vary depending on the material, machine condition, and desired result. Manufacturer recommendations are often a good starting point, but they may not always provide the perfect engraving or cutting effect.
LightBurn provides a useful feature called Material Test, which allows users to quickly compare different parameter combinations. This guide explains how to use the Material Test tool to find suitable settings more efficiently.
Step 1: Open the Material Test Tool
To start a material test in LightBurn:
- Open the top toolbar.
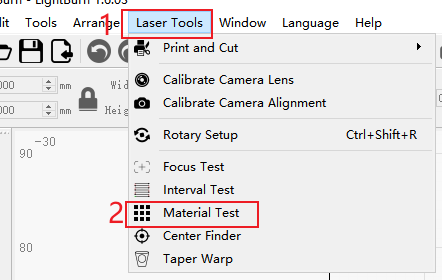
- Click Laser Tools.
- Select Material Test from the menu.
After opening it, LightBurn will display the matrix testing interface. The Material Test tool creates a grid with different parameter combinations. Each section of the grid uses different settings, making it easier to compare results.
Step 2: Configure Matrix Parameters
In the Material Test window, you can define how the test will run:
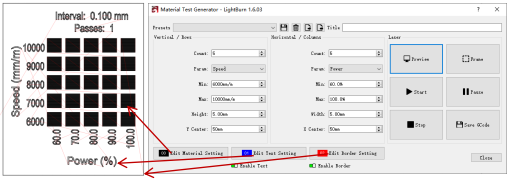
Count
Set the number of rows and columns in the matrix grid. For example, a 5×5 grid will test 25 different parameter combinations.
Param
Choose which parameters to vary along the X and Y axes — options include Speed, Power, Interval, and Passes.
Min/Max
Define the minimum and maximum values for the selected parameters. These values determine the range of variation across the matrix.
Additional Settings (00/01/02 Tabs)
- Edit Material Setting: Configure specific engraving or cutting settings for each matrix cell.
- Edit Text Setting: Set up labels that display the parameter values outside the matrix.
- Edit Border Setting: Adjust settings for engraving a border around the matrix.
At the bottom of the panel, you can toggle whether to include Text and Border in the final output.
Step 3: Preview and Run the Material Test
Before starting the engraving:
- Click Preview to verify the layout and design.
- Use the Frame function to outline the test area on your material.
- If the area is too large or small, return to the Height and Width settings to adjust accordingly.
Once everything looks correct, click Start to run the test.

Step 4: Analyze the Results
After the matrix is engraved, observe the results and select the combination that provides the desired effect.
If needed, you can narrow the Min/Max range and re-run a smaller test to fine-tune your parameters for higher precision.
Conclusion
The LightBurn Material Test tool is a practical way to find suitable engraving and cutting parameters for different materials. Instead of testing settings one by one, users can compare multiple combinations in a single test.
By using this feature correctly, you can reduce trial and error, improve workflow efficiency, and achieve more consistent laser processing results.
Share:
Glass Laser Engraving: How to Engrave Glass with Longer Laser Engravers
更详细的教程:使用 Nano Pro 进行皮革雕刻