
A personalized stamp is a simple way to add a unique touch to crafts, packaging, and handmade projects. With a laser engraver, you can create custom stamp designs with precise details and a professional finish.
In this guide, we’ll show you how to make a custom stamp using the LONGER Ray5 10W laser engraver and a 3mm basswood sheet. From designing the artwork to engraving and cutting the material, you can follow these steps to create your own reusable stamp.
Step 1: Design the Stamp Graphic
First, create the stamp design in your preferred design software, such as LightBurn.
Create Curved Text
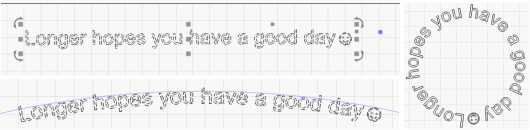
Open the software and use the Text Tool to enter your desired words. To make the text follow a circular shape, adjust the blue control node on the text box. Move it until the text forms the curve you want.
Add the Stamp Outline
Next, use the Circle Tool to create a circle around the curved text. Adjust the size so the text fits properly inside the circle. Then select the circle and use the Offset Shapes Tool to create an additional outer ring. A 1–2mm offset can be used to create the outer edge of the stamp design.
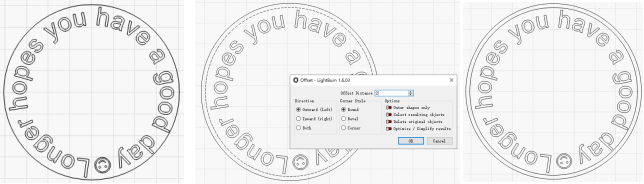
Important: Since stamps are applied in reverse onto paper, make sure to mirror your design — either horizontally or vertically — to ensure the final impression appears correctly.
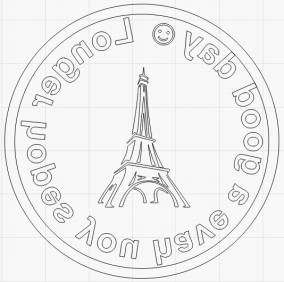
Feel free to add icons or decorative elements to enhance your design and give your stamp a unique character.
Step 2: Set Laser Parameters
After finishing the design, set the laser parameters for engraving and cutting.
Cutting Layer: Outer Circle
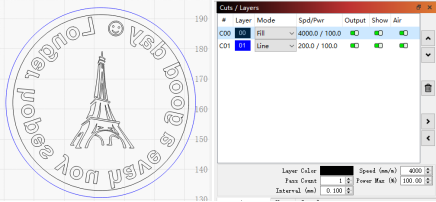
Set the outermost circle to Line Mode. Use cutting settings suitable for a 3mm basswood sheet. The exact speed and power values may vary depending on your machine condition and material quality.
Engraving Layers: Text and Inner Design
Set the text and other design elements to Fill Mode. For stamp making, deeper engraving is important because the raised areas need enough height difference to create a clear impression. Adjust the engraving settings based on your laser’s performance and test results.
If you are unsure about the settings, it is recommended to test on a small piece of material first.
Step 3: Engrave and Cut the Stamp
Before starting the laser process, check all settings carefully. Follow these steps:
- Preview the project in LightBurn.
- Use the Frame function to confirm the engraving area.
- Start the engraving and cutting job.
- Wait until the process is complete.
- Remove the finished stamp from the workbed.
After cutting, you can attach the wooden stamp to a handle if you want a more comfortable stamping experience.
Testing the Finished Stamp
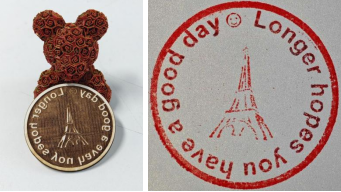
Your custom wooden stamp is now ready to use. Apply ink evenly to the engraved surface and press it onto paper to check the result. A clean and deep engraving can help create clearer stamp impressions. This type of custom stamp works well for:
- Handmade crafts
- Product packaging
- Creative projects
- Personal letters and cards
If the result is not clear enough, you can adjust the engraving depth or improve the design details and try again.
Conclusion
Making a custom stamp with the LONGER Ray5 10W laser engraver is an easy and creative way to explore laser engraving projects. By combining a simple design, proper engraving settings, and careful preparation, you can turn a basic basswood sheet into a personalized stamp.
Whether you are creating gifts, craft supplies, or custom packaging, designing your own stamp allows you to add a unique personal touch to every project.
Cuota:
LONGER How To:Install the latest 30W Laser Module for Longer Ray5
LONGER How To:Adjust the Red Dot Focusing Module on the Nano Duo